Your cart is currently empty!

Do you manage or sell digital assets? Do you handle confidential documents and media?
This tutorial is for you, if you want to use the affordable Amazon S3 (Amazon Simple Storage Service) to host sensitive files and serve them to a select group of users on WordPress.
It goes without saying that Amazon S3 provides developers and IT teams with an object storage service that offers industry-leading scalability, data availability, security, and performance at very affordable rates.
In this guide, we will be exploring how you can leverage WordPress and Amazon S3 in order to share your digital assets with stakeholders by using Groups, our free group-based membership plugin, and Groups File Access, a premium extension.
If you are unsure whether to use Amazon S3 and would just like to learn how to protect files using Groups File Access, please also have a look at our tutorial on How to use WordPress to provide Confidential Documents.
As a case study, we explore how an organization called Safe the Trees uses Amazon S3 buckets to host all their annual PDF project reports and provide these reports to authorized members via their website.
At the end of this article, you will be able to:
- Use Groups and Groups File Access to grant access to digital assets to authorized members.
- Create an AWS Free Usage Tier account, set up an S3 bucket, and upload files (objects) to it.
- Create an IAM user and assign read-only access to a specific bucket for that user via Amazon Policies.
Setting up a Group for Members (Stakeholders)
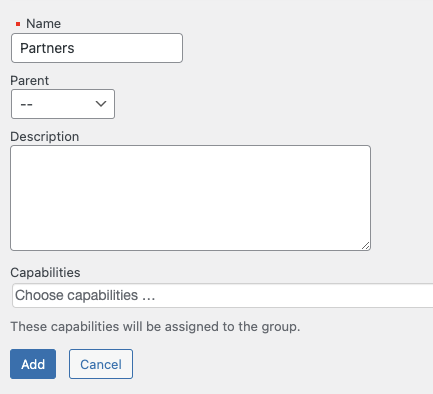
We’ll start off by using the Groups plugin to create a group that we use to identify authorized members. You can install the Groups plugin quickly as shown here. We will use it to determine select users as authorized members, who will have access to protected files. In this guide, we will name that particular group Partners. Depending on your needs, you can set up as many groups as required later on.
From your WordPress dashboard:
- Navigate to Groups > Groups
- Click on New Group
- Enter Partners as the name of the group
- Click Add
You can read more about how to create and manage groups in detail on this documentation page.
Creating a Stakeholder User Account
Next, we proceed by creating a simple user account for each stakeholder. Our stakeholders will use their accounts to access and download project reports. We are going to create one example account below. You would create additional accounts for each person who should have access in the same manner.
Note: As we are going to assign a group during user account creation, go to Groups > Options and enable the Show groups in user profiles option under User Profiles. This option allows us to add the user directly to the Partners group whilst creating the user account. You can read more on this option here.
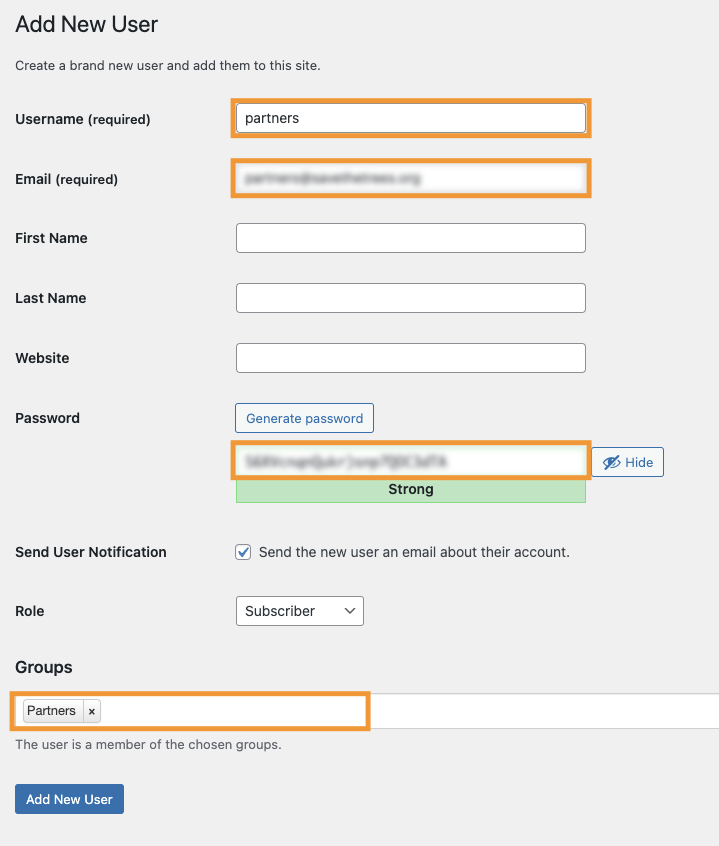
With our Partners group in place, we create a new user account and add it as a member. Go to Users > Add New. Specify a username, email and the desired password for this account. Choose Partners under Groups to make this account a member of the group.
This account will be used by the stakeholder to download the annual project reports.
Setting up an AWS account
Amazon offers the AWS Free Usage Tier which provides a limited quantity of some AWS services at no charge. The free tier will be sufficient to follow this tutorial and even for some cases beyond it. Unless you already have an AWS account you would like to use, follow that link to create your AWS account and then continue below.
Creating an S3 Bucket
With your account created, from your AWS Management Console, navigate to AWS Services > All Services > Storage and click on S3.
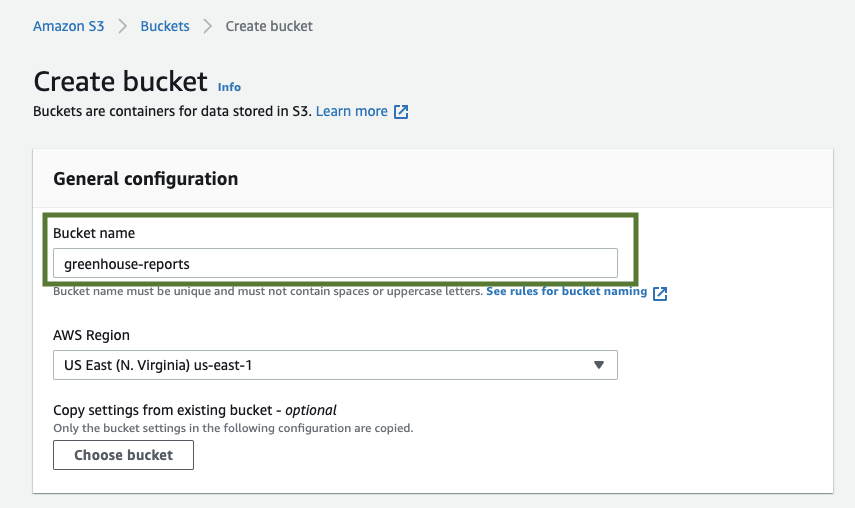
From the resulting page, click on the Create bucket button to view the Create bucket wizard.
Provide the Bucket name and AWS Region. Following our example, we would be naming our bucket greenhouse reports, then proceed to select the AWS Region where you want the bucket to reside. You can leave the other settings as-is and then scroll to the bottom of the page and choose Create bucket.
Adding Files (Objects) to our S3 Bucket
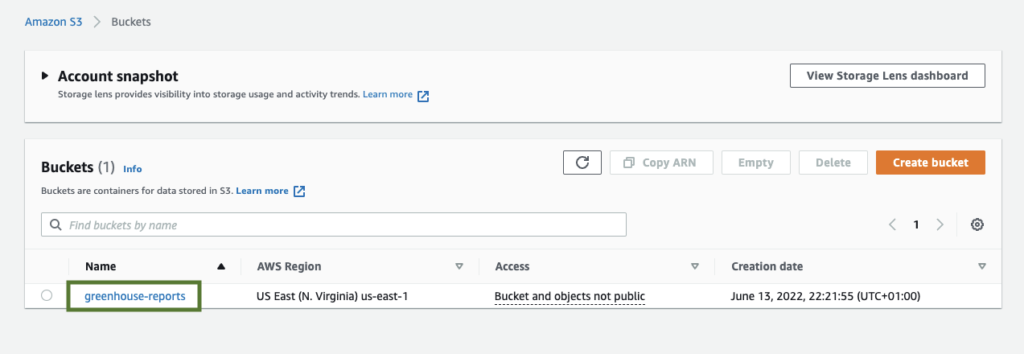
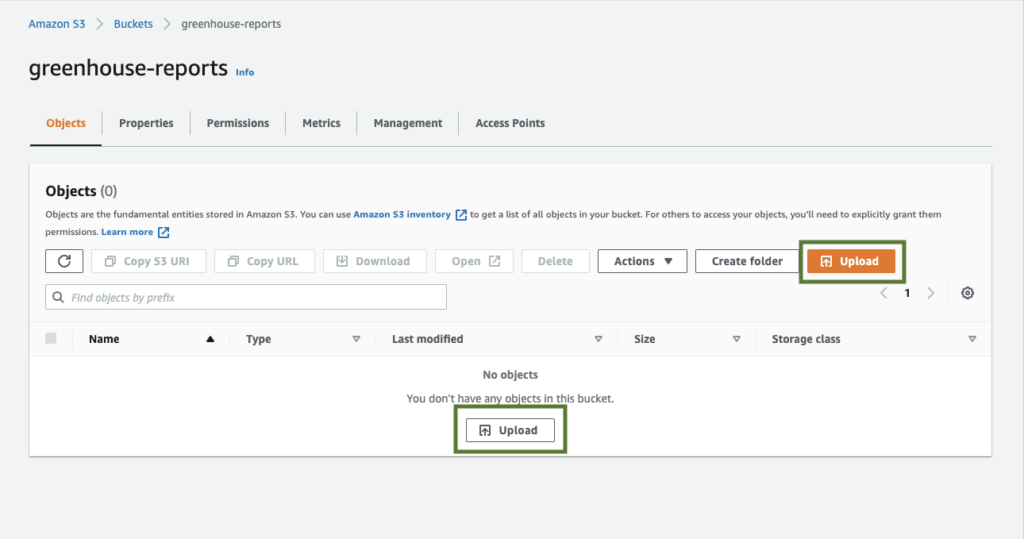
With our greenhouse reports bucket created, we can now proceed to add our files (corresponding to objects in the S3 terminology). Click on the name of the bucket you just created in order to add objects (our reports). In this case, we would click on the just created greenhouse-reports.
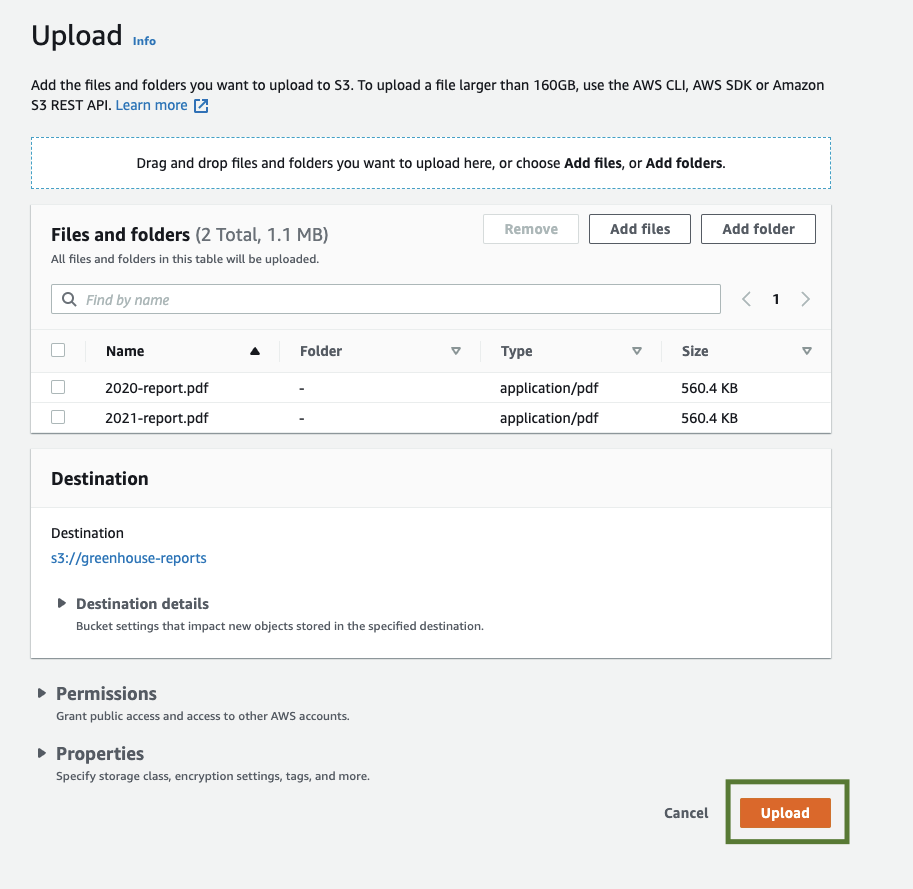
Then proceed by clicking on the Upload button to begin adding objects to the bucket. Please see the screenshot below:
Generating an AWS Access Key ID and Secret Access Key
We would need to generate these keys in order to grant access to your resources.
Before proceeding to generate the AWS access key ID and Secret access key, it is crucial that we create a dedicated IAM user with an appropriate permission policy, this user will be allowed to to read and get files from our greenhouse-reports bucket only. We do not want to do this with our AWS root account.
First, let’s create an IAM user called group_file_access_user. Please note that this user has no relation whatsoever to any user account on your WordPress site.
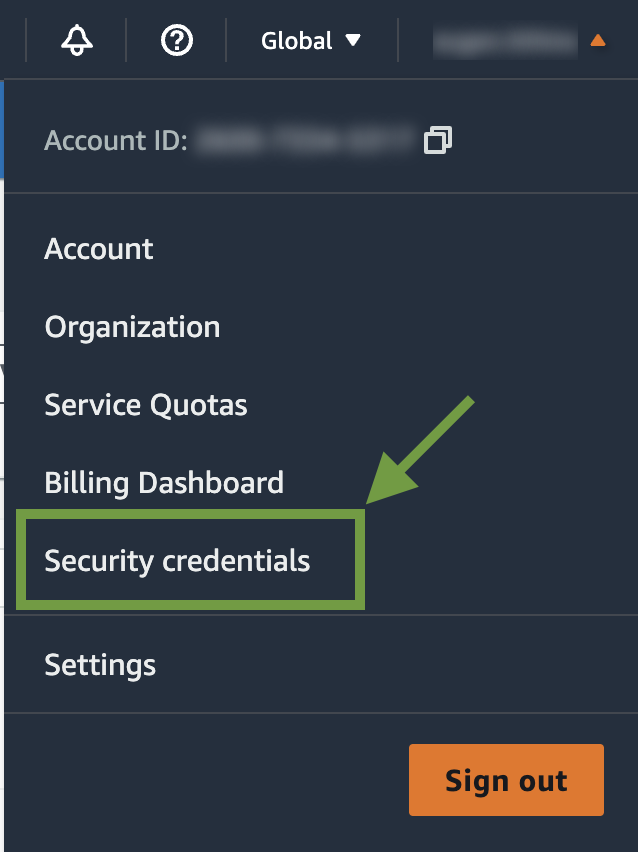
Click on your account Username on the menu bar (the rightmost menu item) and select Security credentials.
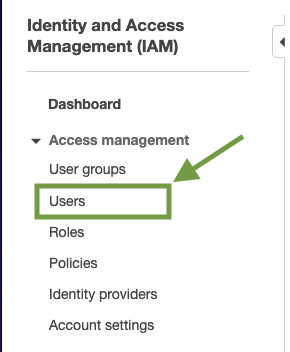
Next, from the sidebar click on Access management tab and select Users. Then proceed by clicking on Add users.
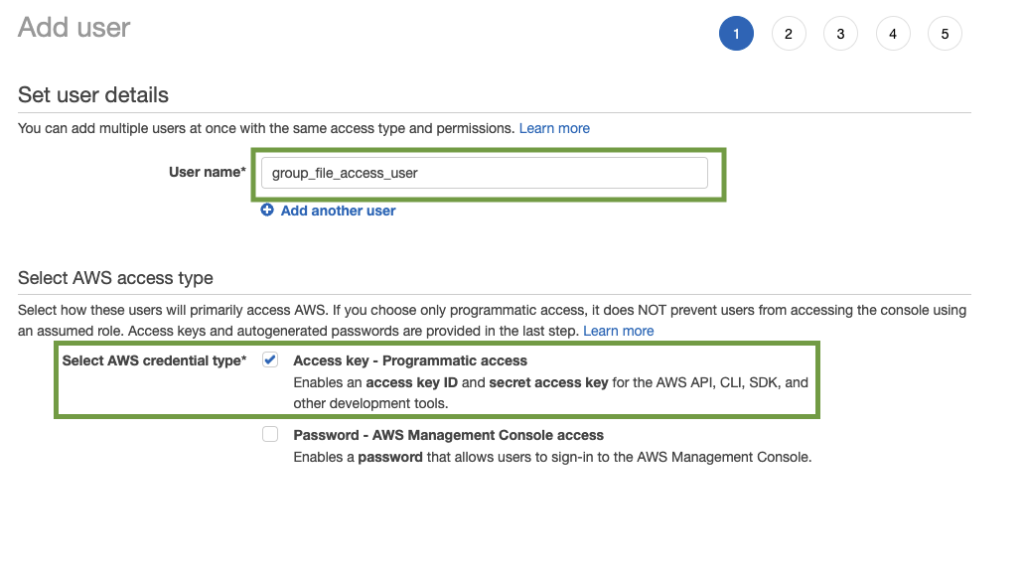
From the resulting Add user page, enter an appropriate name for your user, in this case, we choose group_file_access_user as the User name, then check Access key – Programmatic access option as the AWS credential type.
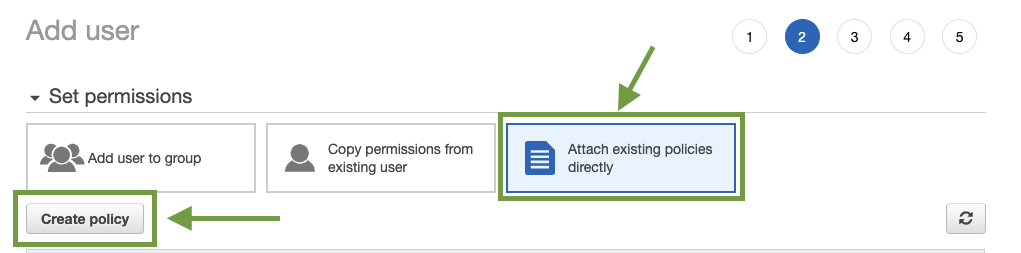
Click on the blue Next:Permissions button at the bottom of the screen to configure the Permissions for our user. From the resulting page, select Attach existing policies directly from the Set permissions tab. Click the Create policy button to create a policy.
You should be redirected to the Create policy page. There you would have two options to configure your policy, either by using a visual editor or a JSON. In this guide, we will be using both approaches to add our policy.
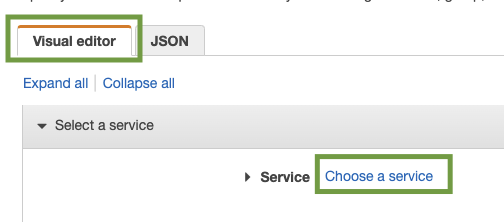
To add a policy with the use of the Visual Editor click on the Visual editor tab and proceed by clicking Choose a service.
Next, from the resulting screen, please use the search box at the top to limit the results in the list of services by typing in S3. From the resulting list, click on S3 to select it.

It is worth mentioning that you can choose only one service within a visual editor permission block. To grant access to more than one service, add multiple permission blocks by choosing Add additional permissions.
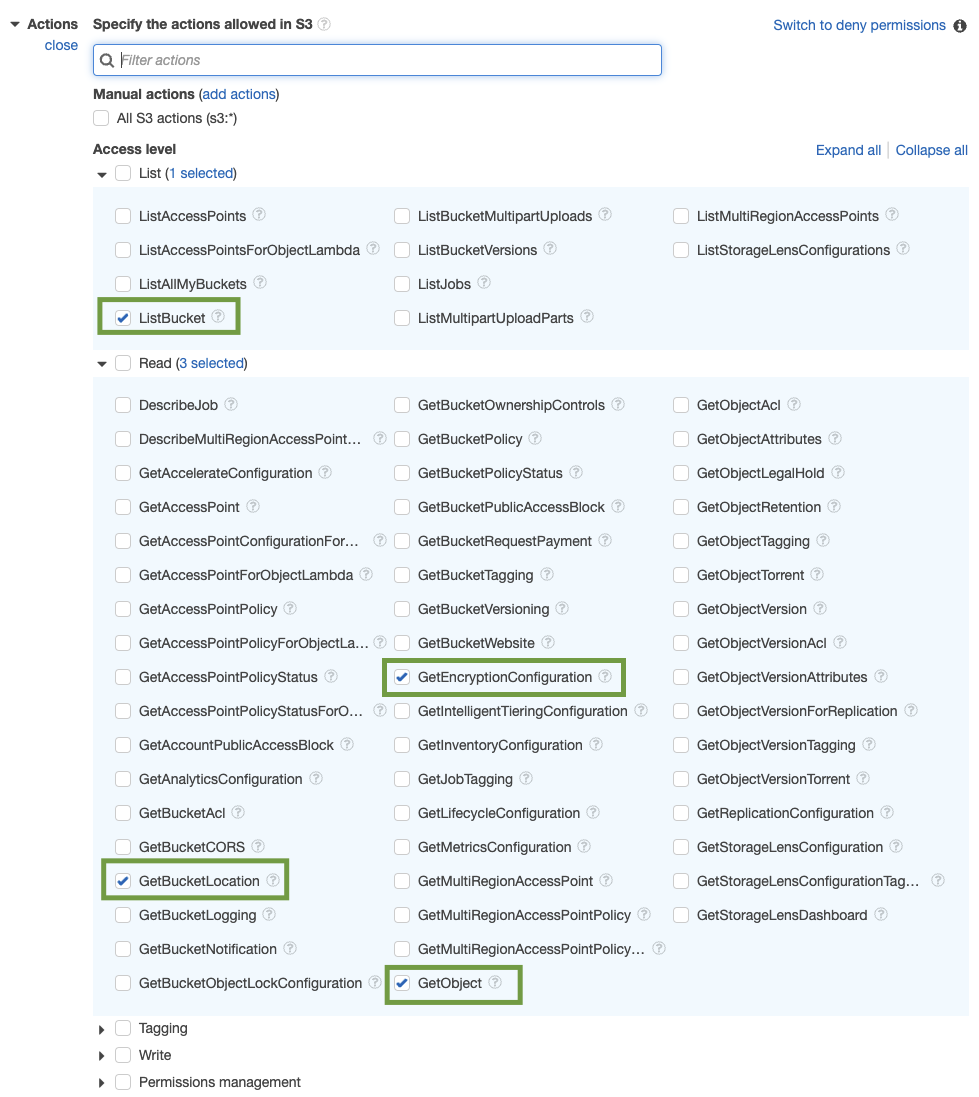
With the S3 service selected, we can proceed with setting up Actions permitted by the policy. Because we are interested in setting up a policy with read-only permission, please ensure you check the following actions: ListBucket, GetBucketLocation, GetEncryptionConfiguration and GetObject.
With the Actions now defined, we would need to configure the Resources which the policy will affect. In this case, because we are interested in ensuring the policy only has access to all the reports within the greenhouse-reports bucket, in the Resources section, set the Resources type to Specific.

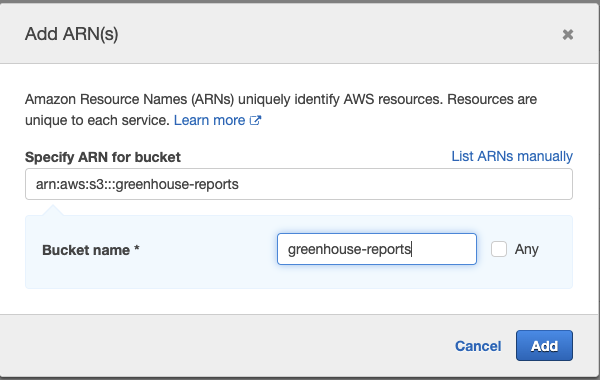
Then proceed by clicking on Add ARN (Amazon Resource Name). From the resulting modal, specify the Bucket name, in this case, enter greenhouse-reports as the bucket name. Lastly, click on Add to save changes.
Next, we’ll need to specify the Object Resource ARN for the GetObject action as it will enable us to grant access to objects within our bucket. To do so, click Add ARN link by object.

From the resulting modal, specify the Bucket name and check Any for the Object name, considering we would love to grant access to all the objects within the desired bucket.

With our Bucket name and Object name specified, click on Add to create the Object ARN.
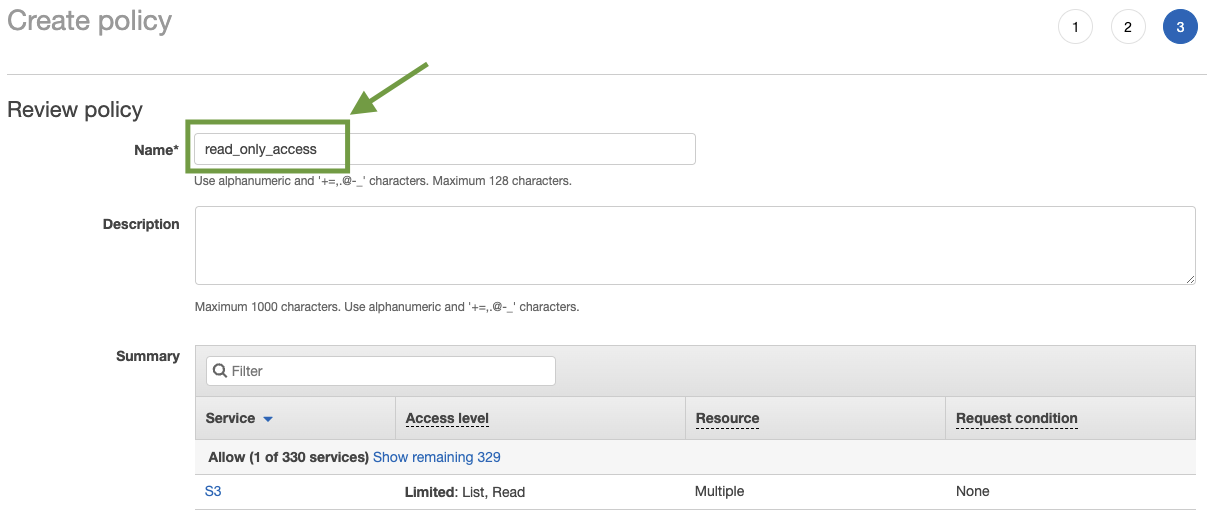
Next, proceed by clicking on the Review policy button to review the policy summary. Next, give your policy a name and click the Save changes button to commit your changes.
Congratulations! You have successfully added a read-only policy to a bucket by means of the Visual Editor.
You can read more on policies here.
With our Policy created, click on Next:Tags, then Next:Review. Proceed by giving your policy an appropriate name and description. In this case, we name it read_only_access. Last but not least, click on the Create policy button to create the policy.
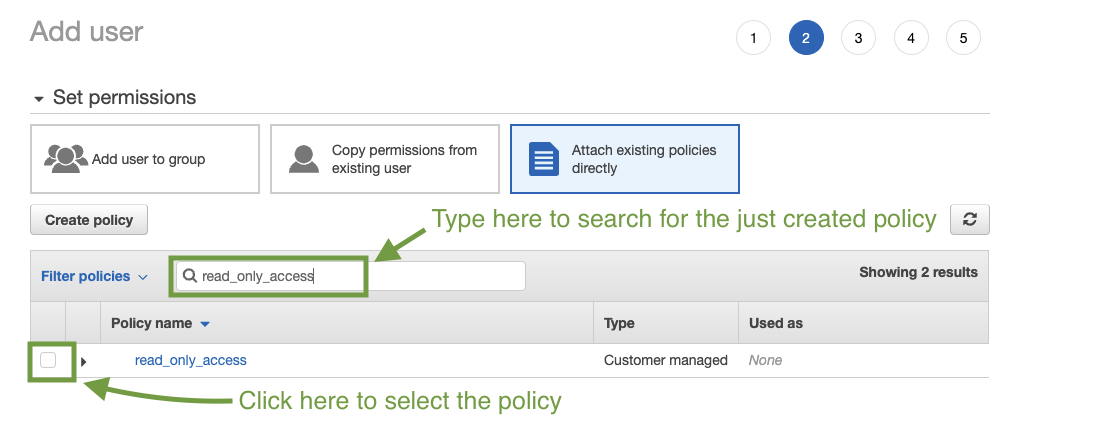
Navigate back to the tab, where the user account was being created and refresh the page. From there you should be able to Attach existing policies directly from the Set permissions tab by searching and selecting the read_only_access policy we just created.
Click on Next:Tags, followed by Next:Review then Create user button.
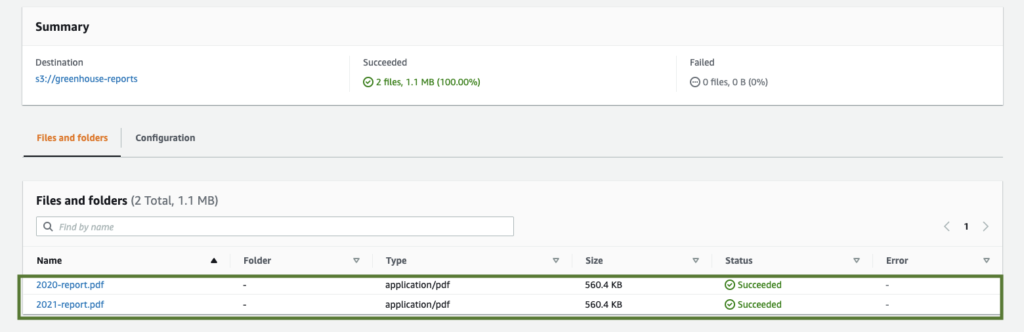
If everything was successful, you should notice the success notification screen, where you can copy and download both your Access key ID and Secret access key.
Make sure to download the key file for this user as soon it is generated by clicking the Download .csv button. You will need to use these credentials to configure the Groups File Access extension, so that it can provide the files that are contained in the bucket to authorized members.
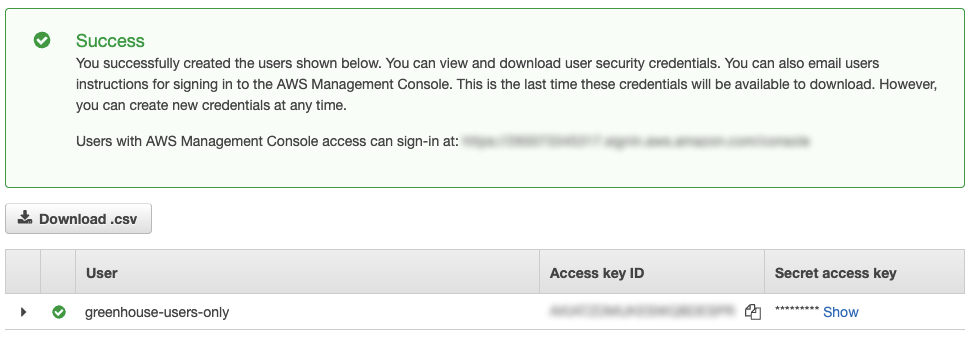
Click the Close button at the bottom of the page.
Congratulations! You have successfully created a user that only has read access to a specific S3 bucket (greenhouse-reports) and all objects within that bucket.
Optional: Creating a policy with the JSON Editor
Skip this section if you have already created a policy with the visual editor as shown above.
You can also add the above policy with the use of the JSON Editor.
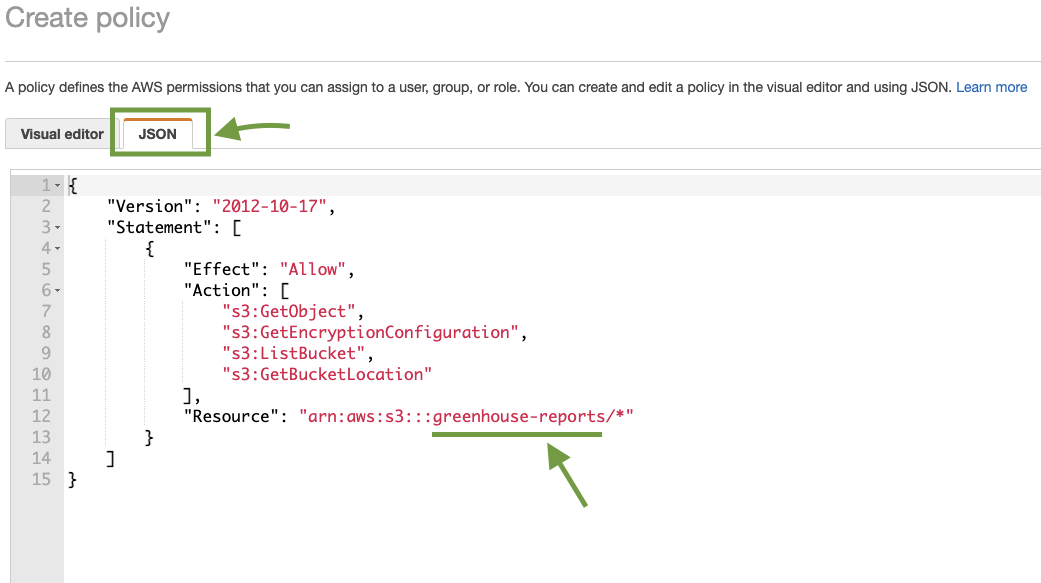
I’ve gone ahead to write the JSON that would be needed to grant access to a specific bucket rendering our files. Click the JSON tab and add the following code:
{
    "Version": "2012-10-17",
    "Statement": [
        {
            "Effect": "Allow",
            "Action": [
                "s3:GetObject",
                "s3:GetEncryptionConfiguration",
                "s3:ListBucket",
                "s3:GetBucketLocation"
            ],
            "Resource": "arn:aws:s3:::greenhouse-reports/*"
        }
    ]
}
The above JSON determines the policy with actions required to access our bucket.
At this point, you can also click the Visual Editor to view the policy configurations generated by the JSON above.
To read more on IAM JSON policy elements, please visit this link.
Configuring Amazon S3 Settings within Groups File Access
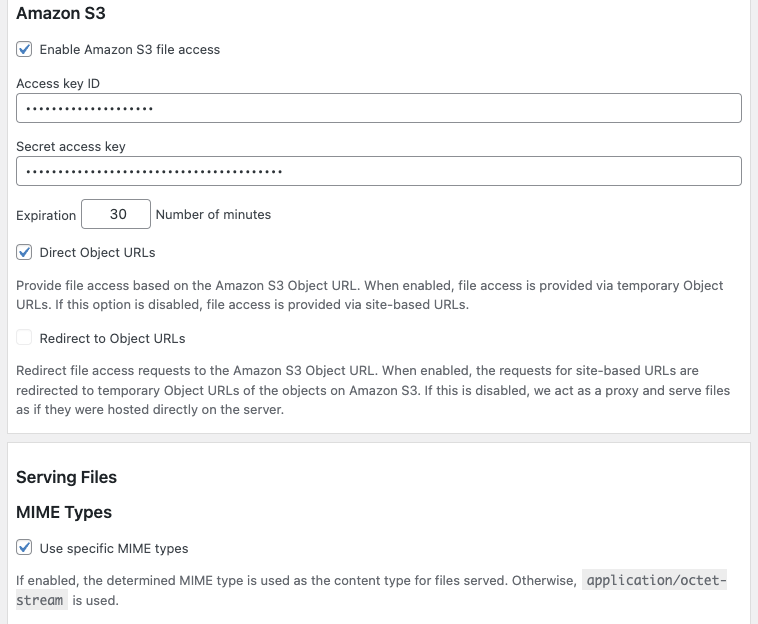
From your WordPress admin dashboard navigate to Groups > File Access then scroll to the Amazon S3 section of the settings. From there we would need to,
- Check the checkbox Enable Amazon S3 file access in order to enable Amazon S3 file access as it is not enabled by default.
- Input the Access key ID and Secret access key.
- Optional: Use the default or set the Expiration time (in minutes) in order to decide on how soon we would like our Amazon S3 signed objects URL to expire.
- Decide on how to serve the Object URLs. We provide two options – Direct Object URLs and Redirect to Object URLs. With Direct Object URLs, your site server acts as a proxy to the file on S3 storage while the Redirect to Object URLs option redirects the Group File Access file URL to the Amazon S3 URL.
Direct Object URLs : If this option is enabled, access to files is provided via temporary Object URLs which point directly to the object on Amazon S3. If the option is disabled, access to files is provided via URLs whose basis is the URL of your WordPress site. In this case, the Redirect to Object URLs will determine how the files are served.
Redirect to Object URLs : When this is disabled, files hosted on Amazon S3 are served by using your WordPress site’s server as a proxy – it will appear as if the files were stored and hosted on your server, when in reality your server just pulls the data from the Amazon S3 object and passes it through to the receiving client. You still get the benefit of saving space on your server, but serving files will consume bandwidth from your server. When this is enabled, requests to files are redirected to the corresponding URL of the object stored on If this option isThis option is available only when the Direct Object URLs option is disabled.
In our example, we will simply use Direct Object URLs, so that the URLs to protected files point directly to the object stored on Amazon S3 and the files are served from there.
Adding an Amazon S3 File
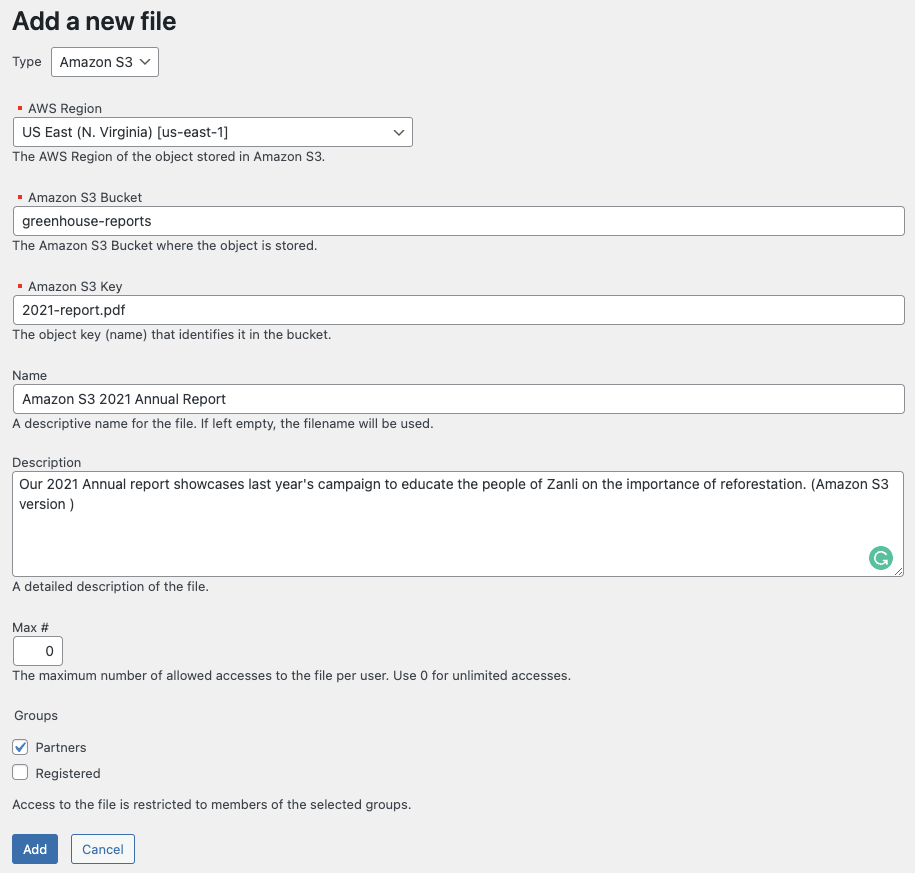
With our Amazon S3 functionality enabled and access keys configured, we can then proceed to add our Amazon S3 files. From Groups > Files, click on New File. From the add a new file page:
- Choose the Type as Amazon S3
- Enter the AWS Region, Amazon S3 Bucket, and the Amazon S3 Key corresponding to the file that you want to provide access to via this entry.
- Select the group that should be allowed to have access to this file. Only members of the selected groups will be allowed to access it.
Here’s an example of the entry for our “2021 Annual Report” file:
Read further to see how powerful this setup can really be, for serving restricted content on WordPress whilst leveraging Amazon’s affordable and readily available S3.
Creating a Page that provides the Reports
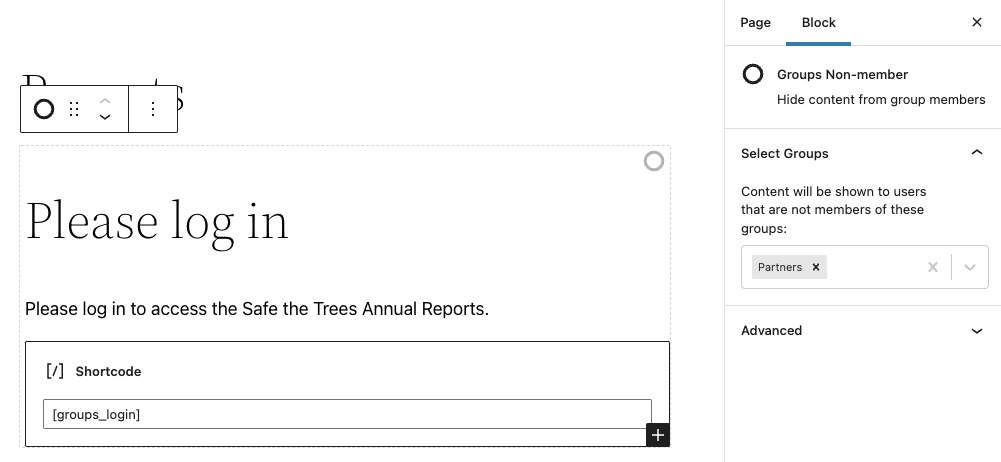
With our report files uploaded to our S3 bucket, we can proceed to create a Reports page that provides all our annual reports to our stakeholders. For that, we are using a combination of blocks and shortcodes provided by Groups. Our stakeholders must log in before they can access the files – the page will offer a login form for users who are not logged in, and a list of downloadable reports for those who are logged in and are authorized to access the files.
We will be using the Groups Non-member block together with the [groups_login] shortcode to render the login form:
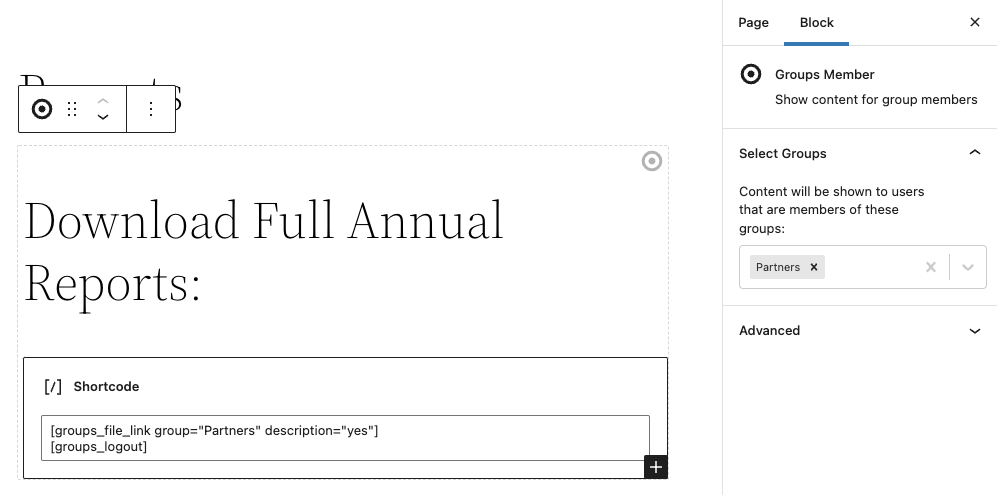
Next, we use the Groups Member block together with the [groups_file_link] shortcode to render access links to our report files.
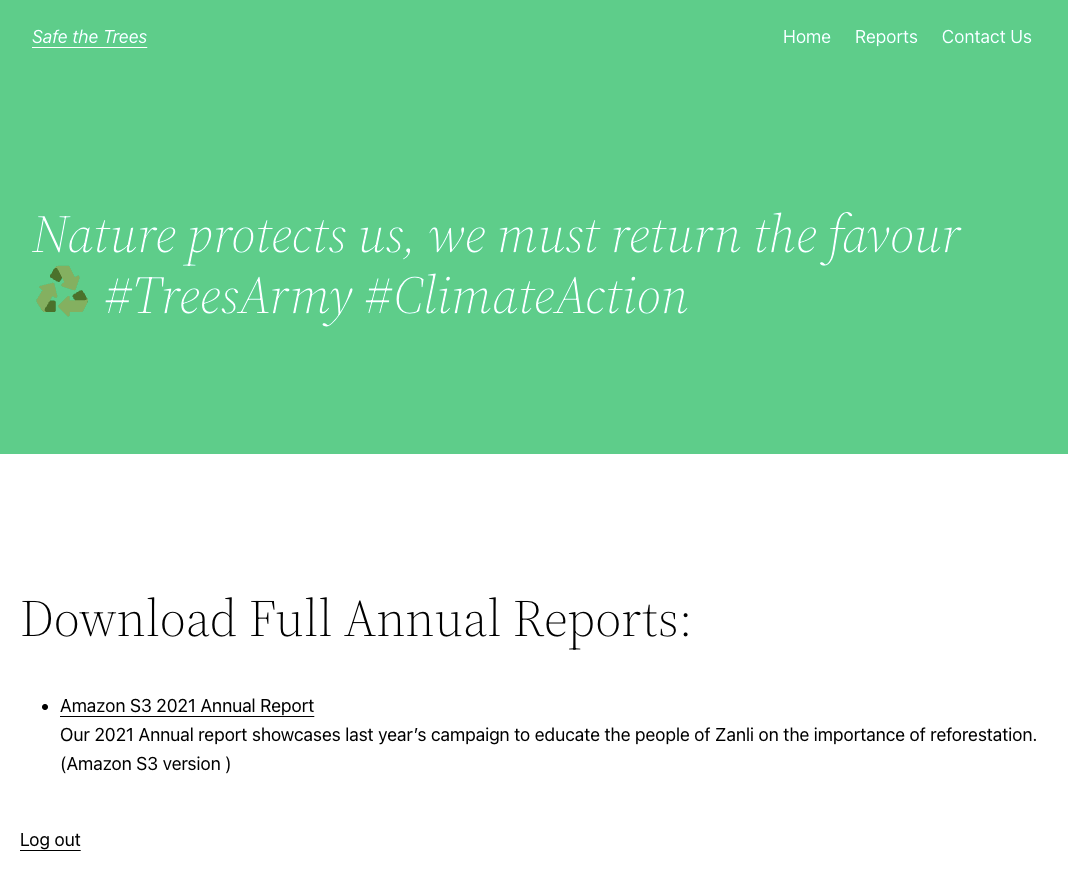
Below we show how an authorized user will see our page. The page shows the two reports that are currently available and provides temporary download links. Note that the files are protected from unauthorized downloads, i.e. you must be connected with an authorized account to be able to use the link.
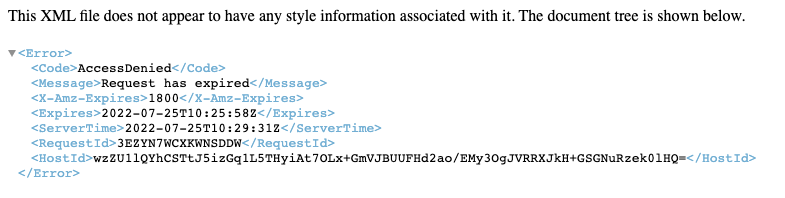
It is also worth mentioning that, because we have a time-limit for the Amazon S3 links, when the time-limit runs out, the user would be unable to access the file even though they are logged in. In this case, you would notice the Access Denied error. For example:
Conclusion
Congratulations! You’ve succeeded in creating an Amazon S3 instance, creating a bucket, and adding objects to the bucket. Furthermore, you’ve created an IAM user that only has read-only rights to a bucket by creating a custom policy. Last but not least we used Groups and Groups File Access to restrict access to our objects to stakeholders only 🥳.
But that’s not all! Now that we have successfully enabled Group File Access with Amazon S3 and configured keys, the limit to the kind of files we can restrict is virtually limitless.
Notice that in our case study above, we used a very lightweight PDF report. However, in many organizations these reports might contain huge amounts of data and images and hence grow to hundreds of megabytes. You might also want to provide videos and other digital assets that can benefit from being hosted on your Amazon S3 storage. That’s where the true power of leveraging these technologies comes in. You can effectively leverage the benefits of Amazon S3 availability and save your server the headache of storing and serving vast amounts of data and files.

We look forward to hear about your experience with this approach. If you have any questions before, during or after, please feel free to comment below!
Image credits: Title image based on a portrait by Aióny Haust
access restriction amazon asset AWS cloud cloud access cloud protection cloud storage digital asset digital asset management digital asset manager file protection files group groups groups file access protected cloud storage restrict restrict access restrict content storage woocommerce WordPress
Leave a Reply